Best USB Telescope Eyepiece Cameras for Astrophotography Beginners
Finding a USB telescope eyepiece camera that delivers clear images without complicated setup can speed up any beginner’s foray into astrophotography. This guide focuses on five popular models that attach directly to 1.25″ telescope eyepieces, offering real-time viewing, simple software workflows, and wireless viewing options for on-sight sharing. Whether you want crisp lunar detail, planetary bands, or basic deep-sky captures, these devices provide a range of budget-friendly choices. The quick-reference product table below highlights each option to help you compare features at a glance.
| Product | Brand | Key Focus |
|---|---|---|
| SVBONY SV105 Beginner Camera | SVBONY | Entry-level imaging, lunar/planetary |
| Tbest 200W USB Eyepiece Camera | Tbest | Broad compatibility, USB2.0, 1.25″ interface |
| SVBONY SV305C Pro | SVBONY | High-sensitivity planetary imaging, 1080p |
| Unalace WiFi Electronic Eyepiece | Unalace | Built-in WiFi, 2K video, 4MP stills |
| 1.5″ screen, remote viewing, 1080P |
|
SVBONY SV105 Beginner Telescope Camera
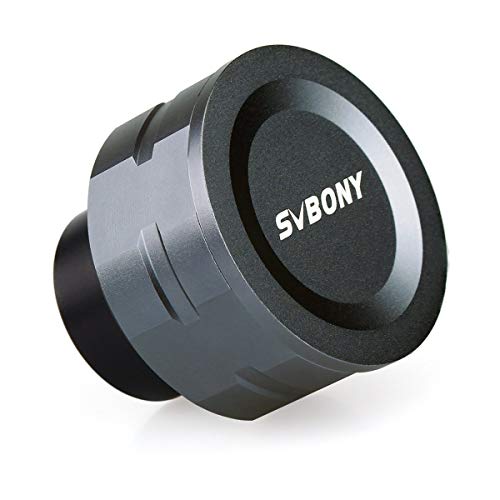
The SV105 is positioned as a practical starting point for astronomical imaging. It uses a 1.25-inch interface with an IMX307 color sensor to deliver bright, color-correct images of the Moon and planets. Its design emphasizes simplicity: point at a target, record a video, and view the result in real time. This model is well-suited for beginners who want straightforward capture without extensive setup. It supports real-time observation on a laptop or PC, and the plug-and-play workflow minimizes the learning curve for new users.
- 1.25″ IMX307 CMOS color sensor for colorful lunar/planetary imagery
- Plug-and-play operation with no driver required
- Real-time video transfer to Windows, Linux, or Android setups
- Software options include Sharpcap Capture (Windows) and AstroDMx Capture (Linux)
For practical use, users typically attach the SV105 to their telescope, point at a strong target like the Moon or a bright planet, and start recording. The device emphasizes quick results and ease of use, making it a common first step for budding astrophotographers exploring basic planetary imaging or terrestrial views through their telescope. The model’s balance of price and capability makes it a reliable entry option for educational projects or hobbyist experimentation.
Tbest 200W USB Telescope Eyepiece Camera

The 200W USB eyepiece by Tbest emphasizes broad compatibility and straightforward setup. It uses a 1.25-inch interface and connects via USB2.0, enabling high-speed data transfer to computers, tablets, or mobile devices. The device is designed for simple operation: install the eyepiece, connect via USB, and begin real-time observation. It supports Windows, Linux, and Android ecosystems, with a plug-and-play approach that helps beginners avoid driver hassles. The kit often targets users who want a flexible, budget-friendly option compatible with a variety of devices.
- 1.25-inch electronic eyepiece interface
- USB2.0 high-speed data transfer
- Broad compatibility: Windows, Linux, Android
- Simple assembly steps for quick setup
Users typically leverage the built-in app ecosystems for real-time viewing and recording. The USB2.0 interface helps maintain stable video streams and minimizes frame drops when connected to a laptop or tablet. This model suits hobbyists who want a versatile device for both telescope viewing and on-the-go observations during outdoor sessions. Its broad compatibility and uncomplicated workflow make it a practical choice for entry-level astrophotography and casual field use.
SVBONY SV305C Pro Telescope Camera

The SV305C Pro is engineered for higher fidelity planetary imaging with a 2MP IMX662 sensor and low-noise performance. It emphasizes high sensitivity to capture fine planetary details even in challenging lighting, helping to reveal bands, storms, and crisp surface features. A standout feature is its high frame rate, delivering smooth 1920×1080 video at up to 107 frames per second. The camera’s low readout noise, reported around 0.7e-, contributes to cleaner frames with reduced interference, especially in low-light conditions. This makes the SV305C Pro suitable for serious planetary work within a consumer-friendly package.
- IMX662 planetary camera with ultra-high sensitivity
- Low readout noise around 0.7e- for cleaner images
- 1080p resolution at up to 107 FPS for smooth footage
- 2MP sensor offers detailed planetary captures
The SV305C Pro is designed to balance portability with performance. Its 2MP sensor and fast frame rates enable observers to capture quick planetary moments—such as Jupiter’s belts or Saturn’s rings—with less motion blur. While it favors planetary imaging, the camera can also perform daytime or terrestrial captures with appropriate filters and calibration. As a mid-range option, it remains accessible to hobbyists who want more advanced capabilities without a heavy price tag.
Unalace WiFi Electronic Eyepiece

The Unalace WiFi eyepiece emphasizes wireless operation and flexible display options. It includes a built-in WiFi hotspot, enabling direct connection from smartphones or tablets without external routers. The device features a 4-megapixel camera that supports 16 MP stills and 2K HD video recording, along with timing and time-lapse modes. This combination makes it attractive for observers who prefer mobile control and the ability to share live views with others across wireless networks. Its 25mm-50mm eyepiece compatibility extends usage across a range of small to mid-sized optical setups.
- Built-in WiFi hotspot for direct device connection
- 4 MP stills, up to 16 MP interpolation; 2K video
- Timing and time-lapse recording options
- Compatible with 25mm–50mm eyepiece interfaces
In practice, users mount the Unalace unit onto compatible telescopes or microscopes, connect a mobile device to its WiFi network, and control capture settings via an app. The wireless workflow can simplify group viewing during outreach or education sessions, while still offering solid image quality for hobbyist astronomy. The device’s combination of portability and wireless control makes it a practical pick for those who prioritize convenience and shared viewing experiences.
Telonixium WiFi Telescope Eyepiece

The Telonixium eyepiece centers on a built-in 1.5″ screen and wireless viewing capabilities. It supports 28mm–50mm scopes through a mounting groove, increasing compatibility with a range of optical instruments. The device provides 1080P HD imaging with a 2MP sensor and enhanced low-light clarity, aided by dark-light compensation for better performance in dim skies. Remote observation is facilitated via WiFi, enabling control from a smartphone or tablet within a comfortable range. This model is ideal for observers who want a self-contained viewing experience with a larger display.
- 1.5″ IPS screen for direct viewing
- Remote observing via WiFi (multi-device connection up to ~49 ft)
- 1080P video, 2MP stills with enhanced low-light clarity
- Fits 28mm–50mm scopes with mounting groove
In practical settings, the Telonixium device reduces the need for external displays or laptops during sessions. The built-in screen provides immediate feedback, while the WiFi link enables screen-sharing to a phone or tablet for group viewing or outreach events. Its wider eyepiece compatibility and remote observing capability make it a compelling option for hobbyists who value a self-contained, user-friendly experience without sacrificing image quality.
Buying Guide
Key considerations when choosing a USB telescope eyepiece camera:
- Sensor and resolution: Higher resolution sensors (2MP or more) generally yield crisper planetary images and more detailed daytime views, but require faster processing and may come at a higher cost.
- Frame rate and exposure: For planets with rapid movement, higher frame rates (above 60 FPS) help freeze motion and reduce blur. Consider cameras with low readout noise for cleaner frames in low light.
- Interface: USB 2.0 vs USB 3.0 can affect data transfer speed and latency. USB 3.0 is preferred for high-resolution video, while USB 2.0 is often sufficient for basic imaging.
- Connectivity: Wired USB cameras are reliable for steady streams, while built-in WiFi models offer wireless viewing but may introduce latency. Decide based on whether mobility or stability matters most.
- Display and control: Some models include built-in screens (like 1.5″ or 2″ displays) or rely on a separate phone/tablet app. Built-in displays simplify field use, while app-based control can enable advanced capture settings.
- Eyepiece compatibility: Most devices use standard 1.25″ interfaces; confirm compatibility with your telescope’s barrel size and any adapters needed for 2″ accessories.
- Software ecosystem: Compatibility with popular capture software (SharpCap, AstroDMx Capture) enhances workflow. Ensure the device supports the software you prefer on your operating system.
- Power and portability: Battery-powered options are great for field use, but some devices rely on USB power or a separate power supply. Evaluate weight and balance for your telescope setup.
- Use case balance: If your focus is lunar/planetary imaging, prioritizing noise performance and frame rate is key. For outreach or casual observing, built-in WiFi and large displays can be more valuable.
When comparing the five models featured here, consider your preferred observing style, device ecosystem, and whether you value a plug-and-play experience or more advanced control. Beginners often benefit from a model with straightforward setup and reliable software support, while more experienced hobbyists may lean toward higher frame rates, better low-light performance, and wireless flexibility for teaching sessions or group viewing. A balanced choice aligns with your telescope compatibility, target subjects, and how you plan to use the captured imagery.